French knot is a very simple stitch that is easy to learn. Once you learn this stitch, there is no limit to what you can do with this knot like the chain stitch. This stitch resembles a knot and hence it is known as the french knot.
WHAT YOU WILL NEED?
- Cotton Fabric (Or it can be worked in any fabric. There are no restrictions for making this stitch with any fabric. I have used a magenta cotton fabric)
- Embroidery hoop, 15cm (6″) (Bigger if you are working on a larger design)
- Tapestry needle
- Embroidery thread
HOW MANY STRANDS OF FLOSS SHOULD I USE FOR MAKING THE FRENCH KNOT STITCH?
In basic embroidery patterns, you will need 6 strands of floss. Depending upon the type of design and thread you are using, you can adjust your number of strands. For the below pictorial I have used all 6 strands of floss.
Step by Step Pictorial Process of making the french knot
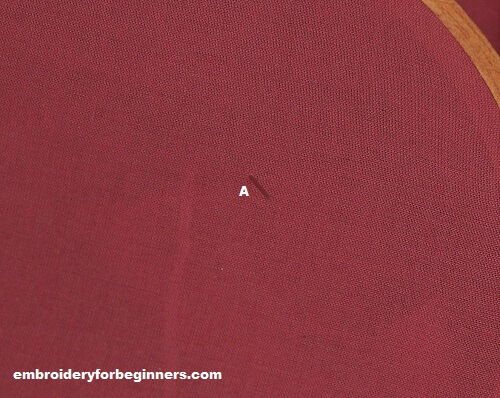
1. Bring the needle up at point A.

2. Pull the thread up.

3. Once the thread is pulled up, loop the thread around the needle right at the end of the thread.

4. Hold the thread and needle with your fingers and gently insert the needle down at point B. The point B should be just beside the point A and not too far away. Also, ensure not to push the needle down at point A.

5. Pull the thread down gently.

6. Pull till the thread is fully pulled through the knot. You can continue to work on more knots or tie the thread at the back and cut it.
Tips for working the french knot.
- Push the needle down at a different point than from where you brought it up. Otherwise, you will end bringing the knot out of the fabric.
- After looping, hold the needle and thread with your hand while inserting down the needle.
- Do not pull the thread down too tightly as it will end up tightening the fabric and the knot.
What is this stitch used for?
- You can make wonderful designs and patterns with this knot.
- An entire design and pattern can be made with this french knot.
- You can fill the center with french knots for a beautifully finished flower.
More stitches tutorials:
Check out the video below for the lazy daisy tutorial
So until next time,
Keep Stitching,
Fareeha
Pin this image for later reference:


Leave a Reply