Embroidery For Beginners

Learn How to Embroider

  • Home
  • Contact
  • Basic Stitches
    • Back Stitches
    • Blanket Stiches
    • Chain Stitches
    • Chevron Stitches
    • Feather Stitches
    • Fishbone Stitches
    • Fly Stitches
    • Herringbone Stitches
    • Knots
    • Running Stitches
    • Satin Stitches
    • Stem Stitches
    • Straight Stitches
    • Weaving Stitches
  • Embroidery Designs
  • About

Wheatear Stitch, How to work a wheatear stitch (Step by Step & Video)

February 9, 2019 By fasembroidery 1 Comment

Wheatear stitch is part of the chain stitch family. It is a little different than the chain stitch, yet is pretty similar. This stitch is named as it resembles wheatear. 

finished wheatear stitch

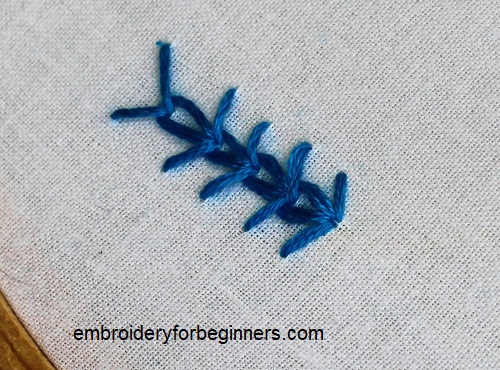
This looks pretty similar to the fern stitch.

What you will need?

  • Any fabric.
  • Embroidery hoop, 15cm (6″) (Bigger if you are working on a larger design)
  • Tapestry needle
  • Embroidery thread

How many strands of floss do you need for making the wheatear stitch?

You can use all 6 strands of the floss. But if you are working on a finer design, then start with 2 strands of floss and increase the number of strands according to your design.

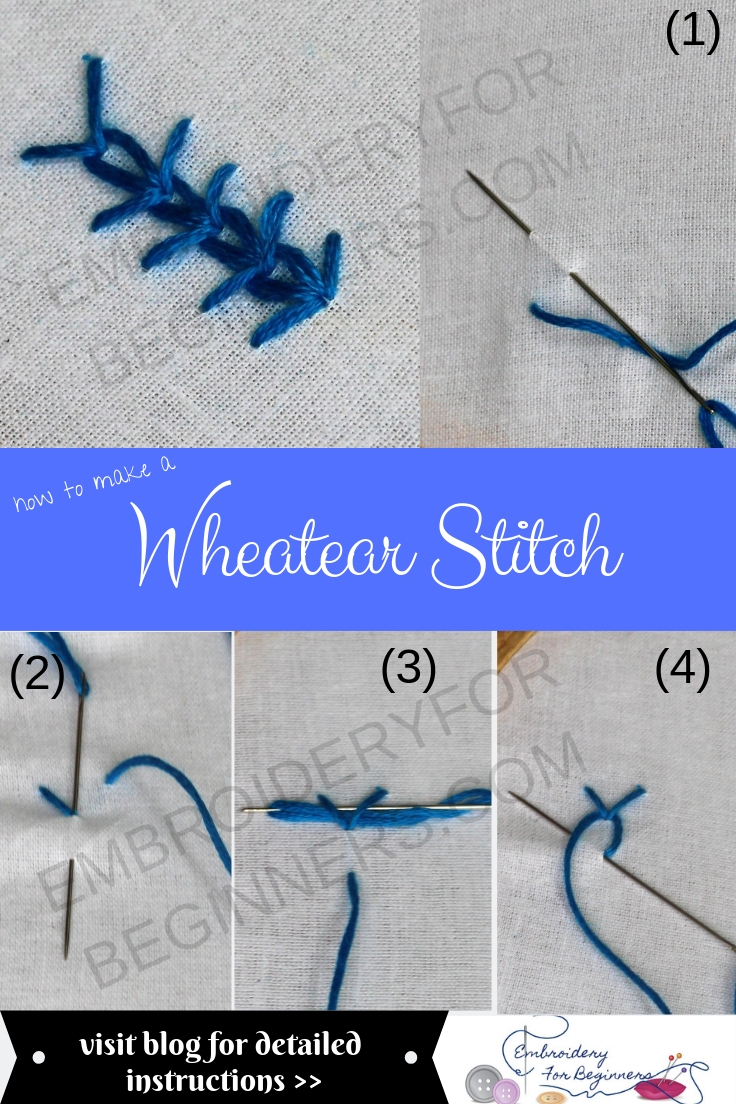
Step by Step Pictorial Process of making the wheatear stitch

white fabric needle

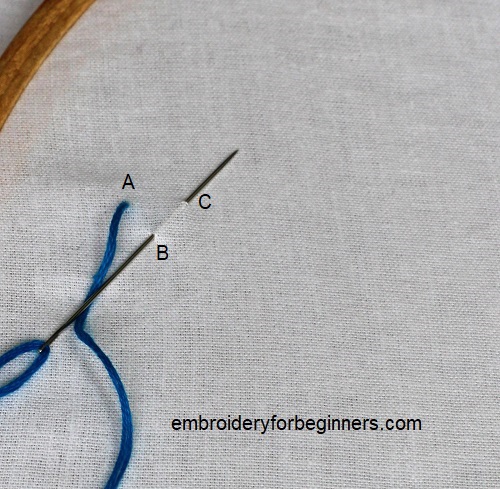
1. Bring the thread up at point A from below the fabric. Make a diagonal straight stitch at point B. Without pulling the thread down make another diagonal stitch at point C.

making wheat ear stitch

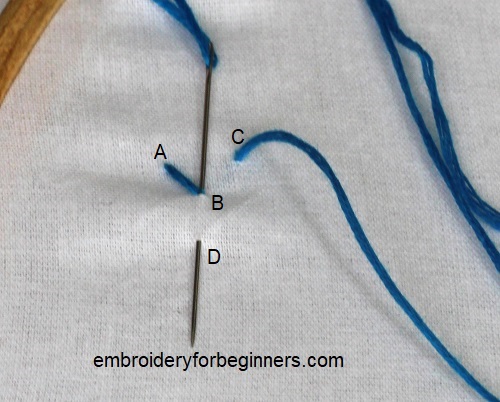
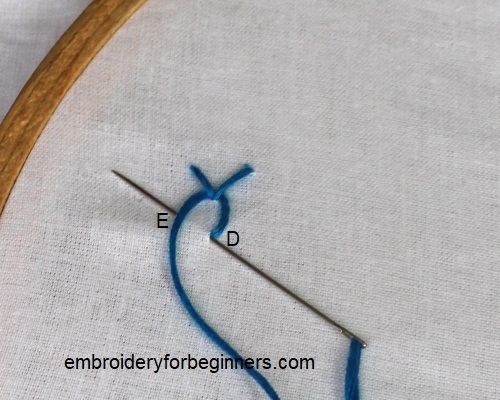
2. Again insert at point B and bring it up at point D. Pull the thread up.

working wheatear stitch

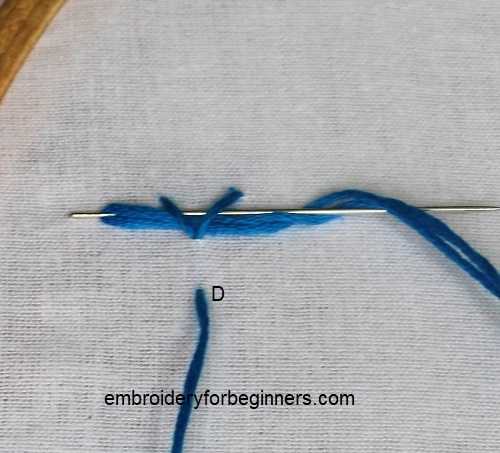
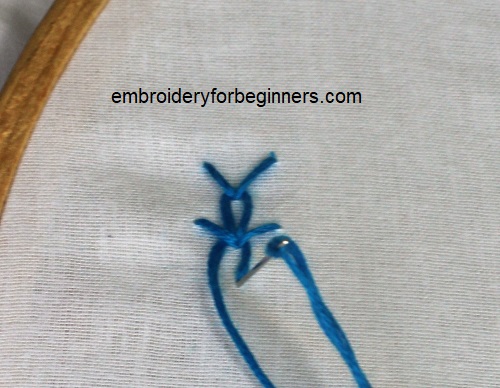
3. Turn the needle to the opposite end and push it through two diagonal straight stitches as shown above.

finishing wheatear stitch

4. Insert again at point D.

needle with blue thread on white fabric

5. You can work on it in a similar fashion for the rest of your design. Please watch the video below for better understanding.

Tips for working the wheatear stitch

  • When you are pushing the needle between the stitches, push the opposite end of the needle.

What is the wheatear stitch used for?

  • You can use this stitch for branches, trees, as grass for a landscape and many other variations.
  • This stitch can also be used for borders.

More stitches:

  • Herringbone Stitch
  • Fern Stitch
  • Cast On Stitch
  • Basque Stitch
  • Double Feather Stitch
  • Long and Short Stitch
  • Trellis Stitch
  • Blanket stitch
  • satin stitch
  • back stitch
  • stem stitch

Check out the video tutorial below

So until next time,

Keep Stitching,

Fareeha

Pin this image for later reference:

wheatear stitch step by step pictures

Tweet
Pin31K
Share
31K Shares

Filed Under: Basic Stitches, Chain Stitches Tagged With: basic stitches, chain stitch

« Herringbone Stitch, How to work a herringbone stitch (Step By Step & Video)
Maidenhair Stitch, How to work a maiden hair stitch (Step By Step & Video) »

Comments

  1. Ann-Marie says

    February 19, 2021 at 7:53 am

    I’m going to try i?

    Reply

Leave a Reply Cancel reply

Your email address will not be published. Required fields are marked *

Join Our Facebook Group

Categories

  • Back Stitches (7)
  • Basic Stitches (118)
  • Blanket Stiches (13)
  • Chain Stitches (24)
  • Chevron Stitches (4)
  • Couching (1)
  • Cretan Stitches (3)
  • Cross Stitches (2)
  • DIY (8)
  • Embroidery Designs (14)
  • Feather Stitches (9)
  • Fishbone Stitches (5)
  • Fly Stitches (4)
  • Herringbone Stitches (4)
  • Jewelry Making (5)
  • Knots (23)
  • Palestrina Stitches (2)
  • Ribbon Flowers (2)
  • Running Stitches (9)
  • Satin Stitches (10)
  • Stem Stitches (7)
  • Straight Stitches (12)
  • Weaving Stitches (8)

Like Us

Join Our Facebook Group

Follow Us

Follow Us

About FAREEHA

I am the developer, writer, and photographer behind this blog, “Embroidery For Beginners”.

You can learn more about me here.

© 2019 Embroidery For Beginners. All Rights Reserved. Pricacy Policy, Disclosure & Disclaimer Site Map