Embroidery For Beginners

Learn How to Embroider

  • Home
  • Contact
  • Basic Stitches
    • Back Stitches
    • Blanket Stiches
    • Chain Stitches
    • Chevron Stitches
    • Feather Stitches
    • Fishbone Stitches
    • Fly Stitches
    • Herringbone Stitches
    • Knots
    • Running Stitches
    • Satin Stitches
    • Stem Stitches
    • Straight Stitches
    • Weaving Stitches
  • Embroidery Designs
  • About

Woven Trellis Stitch, How to work a trellis stitch

January 30, 2019 By fasembroidery Leave a Comment

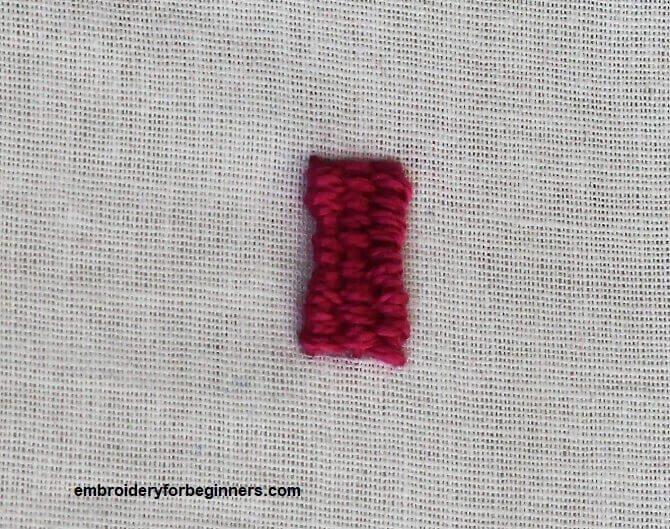
Woven Trellis Stitch is a great stitch that is just perfect for filling any pattern. The way it is woven, this stitch gives a very good dimension to any design. Check the spider web stitch for another variation of this weaving stitches family. 

trellis stitch

WHAT YOU WILL NEED?

  • Any fabric.
  • Embroidery hoop, 15cm (6″) (Bigger if you are working on a larger design)
  • Tapestry needle
  • Embroidery thread (I have used the pearl cotton floss for this tutorial)

How many strands of floss do you need for making the woven trellis stitch?

Since I have used the pearl cotton floss, I have taken double floss for it. But if you take general embroidery floss for the pattern, then you can start with 3 strands of floss and increase the number of strands according to your design.

Step by Step Pictorial Process of making the trellis Stitch

making a straight line

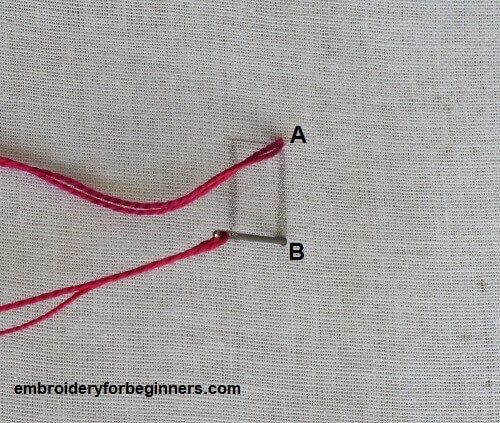
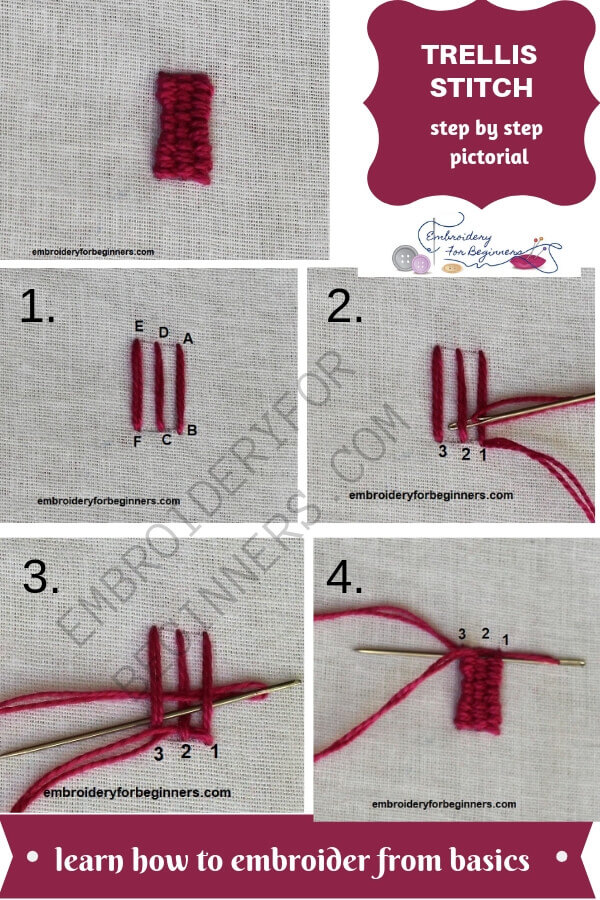
1. Start by making a straight stitch from point A to Point B at desired length.

making a second straight line

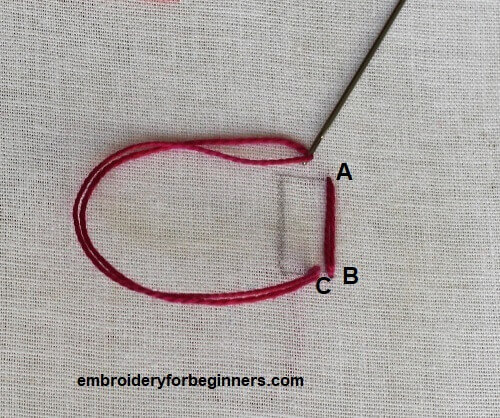
2. Make another straight stitch from point C to Point D.

starting the third straight line

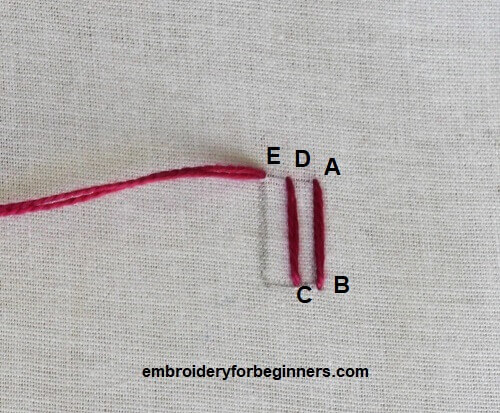
3. Finally, we will make the third straight stitch by bringing the needle up at point E.

three straight line for the trellis stitch

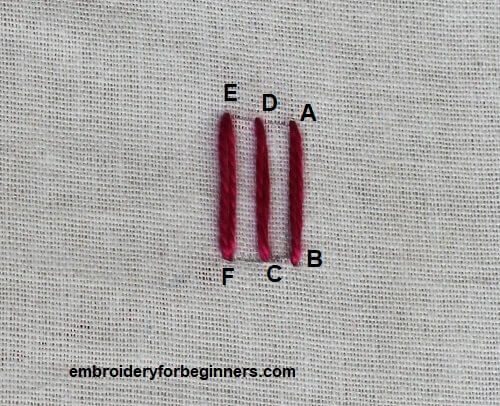
4. Your straight lines are ready to make the trellis stitch now.

inserting needle through the fabric

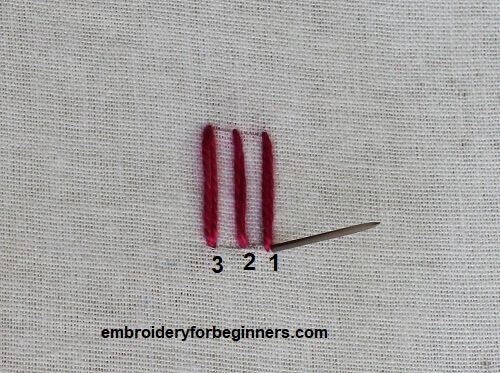
5. Bring the needle up at the bottom of the first stitch. Pull the thread up.

starting to weave the needle for trellis stitch

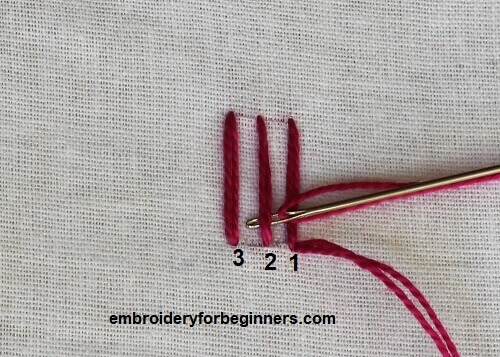
6. Weave the needle around the stitches by taking one up and one down, alternating between the straight stitches.

weaving needle through stitches

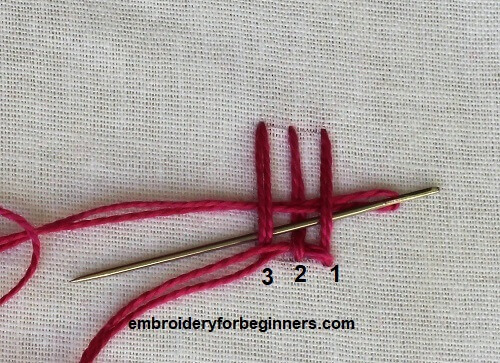
7. Continue weaving around the stitches in a similar way.

completing the trellis stitch

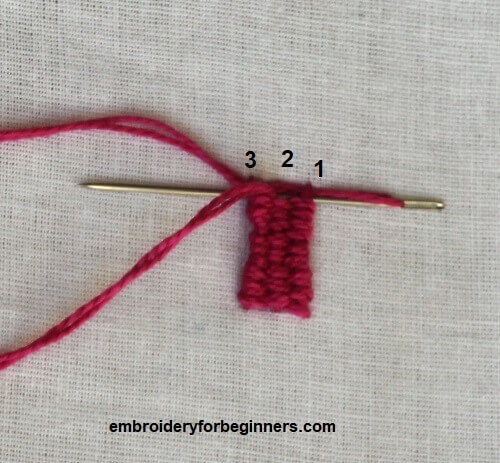
8. Once your weaving is completed take down the needle and secure the knot.

Tips for working the trellis stitch

  • You can work this stitch with as many straight lines as you please.
  • The basic tip is to weave the needle one above the other stitch. That is, alternating the stitches by bringing one up and one down.

WHAT IS THIS STITCH USED FOR?

  • It is a great stitch for filling the pattern.
  • Beautiful flowers can be made using this stitch as a filling to the petal.

More stitches:

  • Fly Stitch
  • Blanket stitch
  • satin stitch
  • back stitch
  • stem stitch

Check out the video tutorial below

So until next time,

Keep Stitching,

Fareeha

Pin this image for later reference:

how to make a woven trellis stitch

Tweet
Pin4K
Share
4K Shares

Filed Under: Basic Stitches, Weaving Stitches Tagged With: basic stitches, weaving stitch

« Fly Stitch, How to work Fly Stitch in Embroidery (Step By Step)
Long and Short Stitch, How to do thread painting (Step By Step) »

Leave a Reply Cancel reply

Your email address will not be published. Required fields are marked *

Join Our Facebook Group

Categories

  • Back Stitches (7)
  • Basic Stitches (118)
  • Blanket Stiches (13)
  • Chain Stitches (24)
  • Chevron Stitches (4)
  • Couching (1)
  • Cretan Stitches (3)
  • Cross Stitches (2)
  • DIY (8)
  • Embroidery Designs (14)
  • Feather Stitches (9)
  • Fishbone Stitches (5)
  • Fly Stitches (4)
  • Herringbone Stitches (4)
  • Jewelry Making (5)
  • Knots (23)
  • Palestrina Stitches (2)
  • Ribbon Flowers (2)
  • Running Stitches (9)
  • Satin Stitches (10)
  • Stem Stitches (7)
  • Straight Stitches (12)
  • Weaving Stitches (8)

Like Us

Join Our Facebook Group

Follow Us

Follow Us

About FAREEHA

I am the developer, writer, and photographer behind this blog, “Embroidery For Beginners”.

You can learn more about me here.

© 2019 Embroidery For Beginners. All Rights Reserved. Pricacy Policy, Disclosure & Disclaimer Site Map